In some contexts, investing heavily in testing is essential. For example, when processing financial transactions at a bank you’d want to have really solid integration tests.
These tests could be a mix of engineered data, re-playing of real-world data that has been manually audited, and maybe even a business rules engine built to double check and alert for any large day-over-day anomalies in processing (a banks’ total deposits increasing 50% day-over-day would be a red flag).
At the same said bank, there is a marketing effort to serve customized banners to the customer’s browser during online banking sessions. Ultimately, the business decides that this software is not critical to the businesses’ operations. The team could then decide to launch and iterate very quickly, only bothering to maintain a critical-path integration test.
Always consider: If the software you develop has bugs, or a customer receives a less than optimal experience, what is the impact on the businesses’:
Operations
Are internal operations degraded?
Are sales being affected?
Reputation
How will customers’ trust for this company be affected?
Will internal customers lose trust with our team?
How will customers (internal and external) have their opinion of the company shifted?
Consider these factors when to determine what your minimum testing requirement is.
I generally error on the side of caution as I suspect many small defects or less than optimal experiences could cumulatively lead to a small, but perceptible harm to the companies’ reputation in the customer’s mind.
Ultimately, the more tests you have, the fewer defects you’ll have, the less manual testing you’ll have to do, the less documentation you’ll have to write, and you’ll end up with a more maintainable product (in most cases).
Under external pressures, like business deadlines, or given a desire to A/B test a new feature, we, as developers must determine what is the minimal amount of testing that could be applied is while still maintaining professional standards.
Before we jump into handling the monetary or scheduling part of things, let’s break this project down by first implementing and manually testing a contract that is able to aggregate a list of lottery entrants, and then randomly select a winner.
We cannot use recent transaction hashes to generate a random number, as there is risk of interference by miners. This blog article explains the concepts in-depth and proposes an alternative solution to using a third-party oracle.
We chose to use Provable for this example because it will support our application development for free both within the Javascript VM and on the Ropsten test network.
To ease development, Provable doesn’t charge a contract for its first request of data done using the default gas parameters. Successive requests will require the contract to pay the Provable fee and the ether necessary to pay for the callback transaction. Both are automatically taken from the contract balance. If the contract doesn’t have enough funds in his balance, the request will fail and Provable won’t return any data.
This works for us, because we only need our contract to select the winner once, at the conclusion of the lottery.
Step 1: Active Provable Plugin for Remix IDE
We need to activate the Provable Plugin Module within Remix IDE. This will allow us to use the Provable API within our Javascript VM deployment environment.
Review Part 1 of this series if you’re not sure how to activate a plugin module in Remix IDE.
Step 2: Write and Test Solidarity Code
pragma solidity >= 0.5.0 < 0.6.0;import "github.com/provable-things/ethereum-api/provableAPI_0.5.sol";contract Lotto is usingProvable { address[] public entrants; address public winner; bytes32 provableQueryId; function enter() public { entrants.push(msg.sender); } function selectWinner() public { if(winnerHasNotBeenSet() && provableQueryHasNotRun()){ provableQueryId = provable_query("WolframAlpha", constructProvableQuery()); } } function winnerHasNotBeenSet() private view returns (bool){ return winner == address(0); } function provableQueryHasNotRun() private view returns (bool){ return provableQueryId == 0; } function constructProvableQuery() private view returns (string memory){ return strConcat("random number between 0 and ", uint2str(entrants.length-1)); } //provable callback for selectWinner function function __callback(bytes32 myid, string memory result) public { if(myid != provableQueryId) revert(); winner = entrants[parseInt(result)]; }}
Here is a basic solidity contract that allows us to enter into the lottery, and then later, randomly select a winner.
To select a winner, we use our Provable Integration to generate a random number, corresponding to our winner.
There are missing features here. Features such as automating the conclusion of the lottery, and actually collecting from and distributing money to participants have not been implemented. We will add more functionality in future articles.
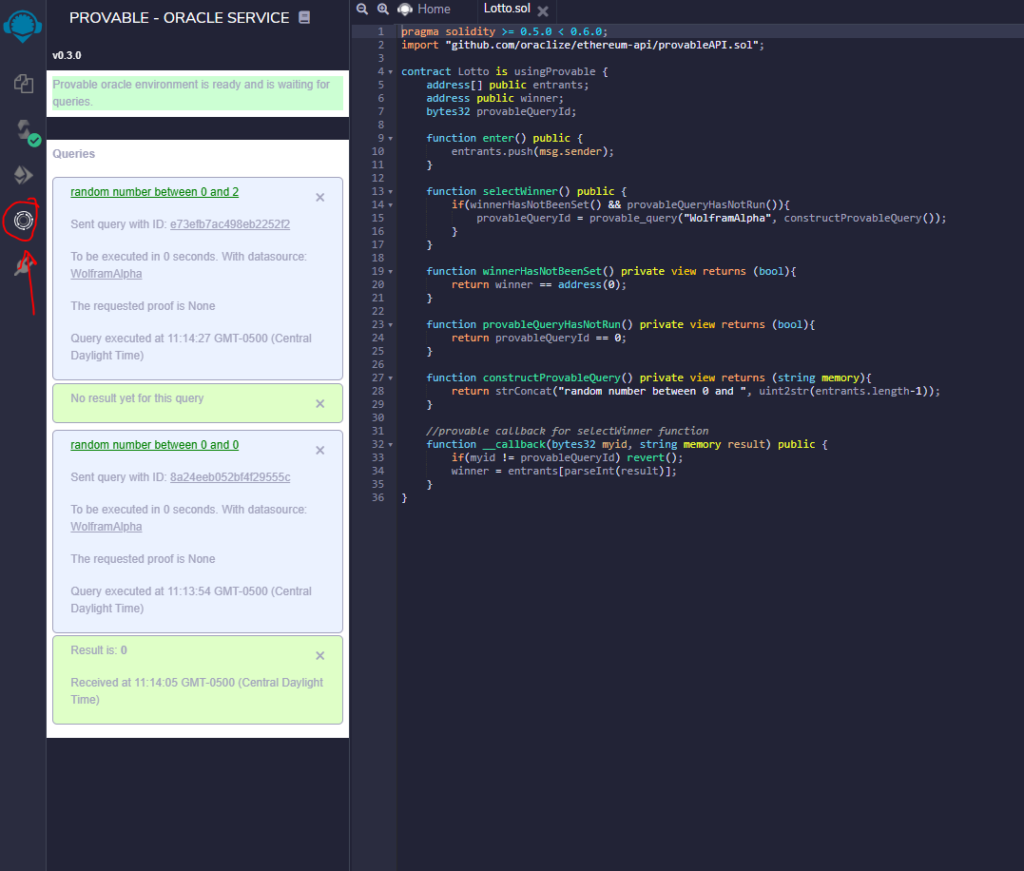
Remember: We activated the Provable Plugin Module for Remix IDE in Step 1. Clicking the provable tab will allow you to see debug information for your program’s interaction with the provable API.
Figure 1: Using Provable interface in Remix IDE
Step 4: Test on Testnet
Install Metamaskfor your browser (create a new wallet)
In the upper right, click the “My Accounts” circle and select “Create Account” to create a second test account
Switch to Ropsten Test Network
Using the Metamask browser plugin, switch between your two accounts on the ether faucet and so that both test accounts have a positive Ether balance on the Ropsten Test Network
Return to the Remix IDE instance, and refresh the page to cause it to reload
Navigate to the Deploy & Run Transactions tab in the Remix IDE instance
Select Injected Web3 as your environment.
When prompted, connect both your test accounts in the Metamask dialog
Select your contract (Lotto.sol)
Click the “Deploy” button
You can now interact with the contract!
Notes on interacting with the contract in testnet:
Change your account in Metamask, Remix will only display the active account
the selectWinner function may take a 10-15 seconds for the callback to be called, just be patient
https://youtu.be/n8KSSXhLZmo
Video 1: Interacting with contract on Ethereum Ropsten Test Network (in real-time, it’s a slow video). In the video, I show how the entrants array is populated and a winner is selected.
Follow-Up
Now that we have basic functionality working, there’s a lot of enhancements we need to add before we have a working lottery. I will be taking these on in future articles. This is not an all-inclusive list.
Add functionality to collect and distribute Ether payments
Use a scheduling service to automatically invoke the winner selection functionality
Only allow certain addresses to invoke the winner selection functionality
Prevent entering the lottery after a winner is selected
Add testing
Programmer’s Note
I am writing this article series as a way to better learn Blockchain programming, and it should not be considered as a source of “best practice”. I’m still learning.
If you spot any issues or have any suggestions, please leave a comment or send me an email.
This tutorial was intended to be used as an educational demonstration of Ethereum and related technologies. We picked a lottery application for our example because we feel it is a game most of our readers will be familiar with while being simple to implement.
Do not run this code in any production settings without contacting a lawyer first for advice. Lotteries are typically regulated in all jurisdictions.
There are no implied guarantees about the quality of this example. Code samples in this article are provided on an as-is basis and could (likely) contain bugs.
Update 9/6/21
Updated code sample to reflect new location of provable import and specify version
Ropsten test network is too slow to use apparently. I was able to run this application successfully on the Korvan testnet
Go to the plugin manager in the Remix IDE to install this plugin.
Figure 1: Plugin manager after installing Deploy & Run Transactions plugin module
Before we can deploy our contracts, we need to be able to compile them. We will install the Solidarity Compiler module for that.
Figure 2: Plugin manager after installing both the Deploy & Run Transactions plugin module and the Solidarity Compiler module.
Step 3: Deploy Default Contract to Memory
To validate our environment is set up correctly, let’s deploy the default sample storage contract to an in-memory blockchain before we proceed with development of our lottery contract.
https://youtu.be/GwvdxVYmG8o
Figure 3: Demonstration of running default contract in Remix IDE
Follow-up
The next article in this series will demonstrate a simple smart contract that both aggregates participants and uses third party oracle to securely generate a random number to determine a winner.
When designing comprehensive integration tests to run in a test environment, one common blocker is the need to mock the behavior of an external API that is outside the control of your team.
Sometimes external vendors do not maintain a working test environment for us to test our code against.
MockServer
MockServer is an open source tool that will allow us to easily mock external services.
Example: Using MockServer to Mock Time API with Kotlin App in Docker Container
Demonstration Client
For our example application, we wrote a simple web-server (Hello.kt), using Javalin, that is able to query a public time server API (http://worldtimeapi.org/api/ip) and parse the Unix time from the response object.
package helloimport io.javalin.Javalinimport khttp.getimport java.io.FileInputStreamimport java.util.*fun main(args : Array<String>) { val props = Properties() props.load(FileInputStream("mockserverdemo.properties")) startWebServer(props)}private fun startWebServer(props: Properties) { val app = Javalin.create().start(8080) app.get("/test") { ctx -> ctx.result(getCurrentUnixTime(props.getProperty("test.timeApiUrl")).toString()) } app.get("/prod") { ctx -> ctx.result(getCurrentUnixTime(props.getProperty("prod.timeApiUrl")).toString()) }}private fun getCurrentUnixTime(queryUri: String): Long { return get(queryUri).jsonObject.getLong("unixtime")}
We need a Dockerfile to specify how to run the sample application in a docker container (source):
Imagine that our time API is not available in our test environment. If that was the case, we can set up a simple MockServer instance to replace the time API in our test environment.
Note that the hard-coded JSON response in this file is the same schema as is returned by http://worldtimeapi.org/api/ip.
Configure Docker Compose
Next, we need to create a file docker-compose.yml to use with Docker Compose. This configuration specifies how to run our two containers, the demo client application container (called app) and our mockServer container (mockserver docs).
Docker will download a pre-built MockServer container and use our properties file mockserverconfig.json.
A logical future enhancement to this demonstration would be to conditionally load the MockServer container (only load it in the test environment, not in production).
Add Properties File
You may have noticed we have two properties specified in our client (Hello.kt), test.timeApiUrl and prod.timeApiUrl:
prod.timeApiUrl is our real, functioning time api endpoint on the internet
test.timeApiUrl is our static mock endpoint provided by the MockServer container
To responsibly test changes before deploying them to production, we need a test environment that behaves, in as many aspects as possible, the same way as our production environment does.
Integration tests should be running in an environment that is as close to production as possible.
We want the ability to reproduce production issues in our test environment for further analysis.
If our test environment only contains engineered test data, we’re going to potentially miss or have trouble reproducing a lot of input data or program state related issues.
Program State Issues
An example of a program state related issue would be having inconsistent data in our database. This would likely lead to undesired application behavior (bugs).
If our test environment only consists of manually engineered database records, it’s possible this bug would be missed in test, making it only detectable in production.
Input Data Issues
An example of an input data issue would be a program that reads CSV files into a database has an issue processing null fields, and some input data contains null fields.
If we only use manually engineered test input data, with no null fields, we will not encounter this issue in test.
Detecting/Reproducing Program State Issues: Mirroring Existing Production State in Test
Copy Down Production Data Stores
In deterministic applications, all program state is driven by input data. That being said, it’s often not possible to replay all input events from all-time or replicate historical one-off manual data migrations performed in production. This is why we should consider copying data stores to replicate application state.
The general idea here is that we want to copy down, from production to test, the data stores our application will interact with (dynamo tables, MySQL databases, etc).
Preferably, you’d do a one-time migration from your production data store to your test data store, and then as an ongoing synchronization method, copy all future state changing events from production to test (as we will talk about in the next section).
Figure 1: Production and test environments without a method of copying production data to testFigure 2: Depiction of how to implement production mirroring into test environment
If it is not possible to duplicate all input data that changes state into your test environment (from production), the only feasible solution may be to set up timed jobs that copy data from production to test on a periodic basis. There are many tools that support running jobs on a timer, including Jenkins and Rundeck.
Figure 3: Depiction of a cron-based data copy down
Remember, our goal here is to create a test environment that replicates our production environment as closely as possible.
Stateless Applications
If your application is stateless (does not store data), there is no need to implement a data copy down process to mirror existing application state.
Addressing Input Data Related Issues
We want to copy input events from our production environment to our test environment to both detect input data related issues as well as maintain consistency with our production application state (in stateful applications).
Essentially, we need two things:
A mechanism to copy input data (HTTP requests, events, etc) from production to test. This can be automatic or on-demand with some qualifier.
Integration tests that incorporate as much real-world data as possible.
Often a combination of existing program state and specific input data are required to reproduce a bug, so it’s important to address both aspects of copying down production data.
Let it Bake
Once developers have a test environment that is comparable to their production environment: the infrastructure is the mirrored, the application state is mirrored, and the data being processed is flowing through both environments, they canlet their releases “bake” in test before releasing to production.
Developers can deploy new releases to the test environment, wait a specified period of time, and then compare the output of their test deployment with the output of their production deployment.
A delayed release strategy will lower operational risk by allowing developers to see how their code behaves in a production-like environment before actually deploying to production.
Potential Pitfalls
Data is Confidential
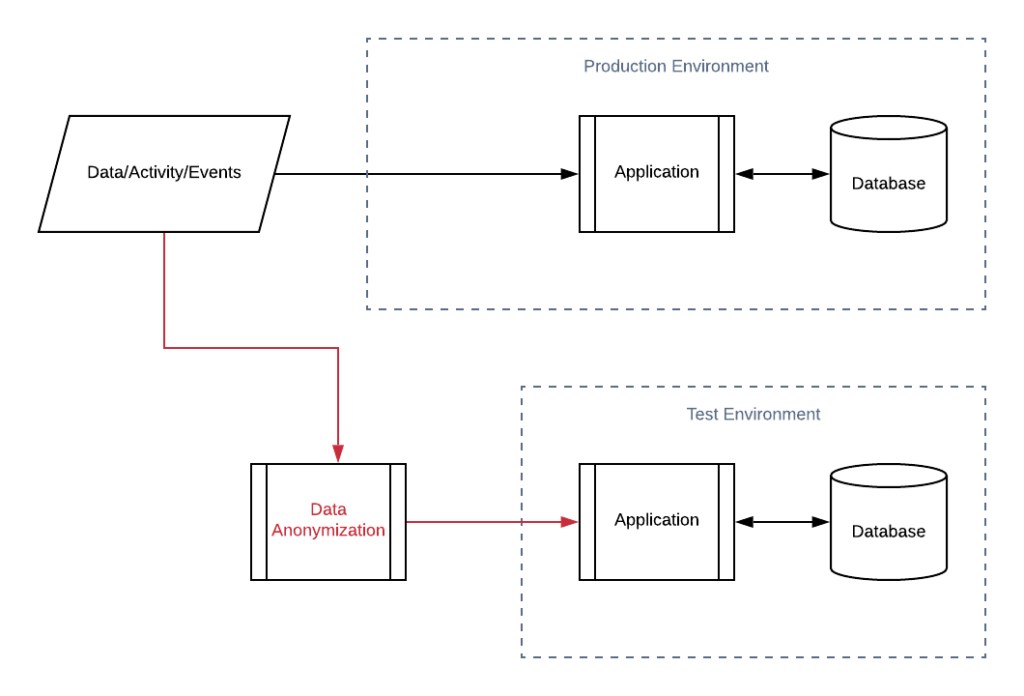
If you are working with confidential data, or other limitations prevent you from copying production data to test as-is, you’ll need to implement a data anonymization process.
Figure 4: Data anonymization applied to input data copy down
If the fields considered confidential are not processed by the program under test, it may be sufficient to have your copy down process replace those irrelevant values with dummy values without any negative consequence (e.g. if SSN is irrelevant for our app, we can just zero-fill the field when copying down to test).
However, if the fields considered confidential are processed by the program under test, we will need to do consistent replacement.
Consistent Replacement
If you have a field that is considered sensitive and cannot be copied to the test environment, but, the field is used by the application, we must do a consistent replacement when anonymizing the data. Consistent replacement is where we replace sensitive fields with a consistent dummy value, using a persisted mapping, during our anonymization process.
Figure 5: Data anonymization applied to input data copy down with persisted mappings for consistent replacement
Take, for example, an application that reads in banking records, and indexes transactions in a database by the customer’s last name. If the last name field is considered confidential information, we cannot just randomly replace the field when anonymizing, we must replace the field with a consistent replacement value every time.
If, the customers’ last name was Johnson, and we replace it with Phillips, we must store that mapping (Johnson->Phillips) to ensure every future instance of Johnson is replaced with Phillips when anonymizing future data.
The replacement mappings should be treated as sensitive production data.
Whatever data store is used to store the mappings used for consistent replacement should be very high throughput to avoid bottle-necking the system. I’d consider Redis or AWS DynamoDB for this.
Don’t forget: Your consistent replacement method should also be used when doing the initial data migration.
Example Scopes of Consistent Replacement
Per input file
Daily (clear real->dummy cache daily)
Permanent
Not Feasible Due to Cost or Performance
Here are some things to consider if you are running into performance barriers:
Limit consistent replacement scope (don’t store replacement mappings permanently if you only need them daily)
Multi-tenant systems: Only process a subset of tenants
For stateless applications: Only copy down a subset of production data
This blog post will show, using videos, how to perform basic refactorings in IntelliJ. I’m using the IntelliJ 2020 community edition and OBS Studio to create these videos.
There should exist (or you should write) comprehensive test coverage on all code within the scope of our refactor. This is to help ensure that nothing, functionally, is changed during refactoring.
A common pattern for junior developers is to place a lot of code in a single method, but logically break it up with comments and log statements. This tells us that there is one method responsible for multiple operations (not ideal) and alerts us that the class should probably be refactored.
Here we have a simplified example, Demo.java
import java.util.Map;public class Demo { public String getFirstName(String domain, String username){ // step 1, generate connection string System.out.println("Generating connection string"); String connectionString = Constants.BASE_DB_URL + domain; // step 2, get mapping of usernames to first names DbQueryDummy dbQueryDummy = new DbQueryDummy(connectionString); Map<String, String> dbUsernameToFirstName = dbQueryDummy.getDbUsernameToFirstNameMap(); return dbUsernameToFirstName.get(username); }}
public class Demo { public String getFirstName(String domain, String username){ return getFirstNameFromDB(username, getConnectionString(domain)); } private String getFirstNameFromDB(String username, String connectionString) { return new DbQueryDummy(connectionString).getDbUsernameToFirstNameMap().get(username); } private String getConnectionString(String domain) { System.out.println("Generating connection string"); return Constants.BASE_DB_URL + domain; }}
In my opinion, this refactored code is better because we’ve:
Eliminated the temporary variables
Split the getFirstName method into two logically discrete parts
Alleviated the need for explaining comments; We have nicely named methods instead
If this was real world code, I’d love to refactor DbQueryDummy to remove the chained method call in our getFirstNameFromDB method, but that’s not important for the purposes of this article.
Refactoring in your IDE does help eliminate silly mistakes, but it isn’t perfect. Using an IDE doesn’t negate the need for comprehensive testing around the code being refactored.
Often as developers, we need to add unit testing to legacy code while being unable to make non-trivial changes to the code under test.
In legacy code, logging and other resources are often set up in a static initializer. That code won’t execute nicely in a unit testing environment (could be using JNDI or something else that doesn’t work nicely with unit tests without mocking).
If we’re using Mockito with Powermock the solution to this problem is simple: we need to suppress the static initializer from executing.
Let’s take a look at a simple example of suppressing a static initializer. We have a class ClassWithStaticInit, where we’re assigning a string field in our static initializer to “abc”.
public class ClassWithStaticInit { final static String field; static { //this block could contain undesirable logging setup that doesn't work in a test environment field = "abc"; } public String getField(){ return field; }}
In the following test, we suppress the static initializer for ClassWithStaticInit using the @SuppressStaticInitializationFor annotation. You can see the return value of the method unit.getField() is null, because we have suppressed the static initializer of ClassWithStaticInit, preventing the field from being set.
import org.junit.Test;import org.junit.runner.RunWith;import org.mockito.InjectMocks;import org.powermock.core.classloader.annotations.PrepareForTest;import org.powermock.core.classloader.annotations.SuppressStaticInitializationFor;import org.powermock.modules.junit4.PowerMockRunner;import static org.junit.Assert.assertEquals;@RunWith(PowerMockRunner.class)@SuppressStaticInitializationFor({"ClassWithStaticInit"})@PrepareForTest({ClassWithStaticInit.class})public class SuppressStaticInitTest { @InjectMocks ClassWithStaticInit unit = new ClassWithStaticInit(); @Test public void testSuppressingStaticInitializer(){ assertEquals(unit.getField(), null); }}
Now, if we don’t suppress the static initializer, we can see that the static block has executed, assigning the value “abc” to field.
import org.junit.Test;import org.junit.runner.RunWith;import org.mockito.InjectMocks;import org.powermock.core.classloader.annotations.PrepareForTest;import org.powermock.modules.junit4.PowerMockRunner;import static org.junit.Assert.assertEquals;@RunWith(PowerMockRunner.class)@PrepareForTest({ClassWithStaticInit.class})public class DoNotSuppressStaticInitTest { @InjectMocks ClassWithStaticInit unit = new ClassWithStaticInit(); @Test public void testSuppressingStaticInitializer(){ assertEquals(unit.getField(), "abc"); }}
If you want to evaluate a testing plan, you must also consider your alerting plan.
Alerting and testing are complimentary, both serve to identify defects. Testing typically serves to identify defects before code is deployed to production, while alerting typically notifies developers of an issue with a running system.
You need to consider both testing and alerting to create an effective defect mitigation plan.
Start by asking yourself a few important questions:
What is the businesses’ tolerance for defects in production of this system?
Can we easily rectify production issues with this system postmortem (after being alerted), or will it cause non-trivial damage to business operations and reputation?
Are developers capable and willing to do on-call fixes to production systems? How much ongoing cost is there in training?
Once you’ve identified your tolerance for defects in production (and ability to fix them), you can better evaluate what preventative measures should live as real-time alerting, and what measures should live as pre-deployment tests.
Often, I find that using alerting to catch errors is a magnitude less of a time investment compared to developing comprehensive integration testing to catch the same defects. The downside is that resolving the alerts still requires developer time and manual effort.
In my opinion, alerting on production systems is more fundamental than automated testing, but both should play some role in designing a defect mitigation plan.
The point is: You can’t design a good testing plan without having an alerting plan.
One very peculiar issue I’ve run into during development is an issue where I have a parent pom.xml file and a child pom.xml file. The child pom.xml file imports the parent artifact as a dependency.
Now, when we make changes to dependencies in the parent pom.xml file, we don’t see them reflected when building the child pom.xml file, the child is still pulling in an unwanted dependency version from the parent.
What’s the issue?
Is the parent artifact being published to the local maven repository correctly? Yes it is, that’s not the issue.
A common problem for Java developers that wish to get comprehensive unit test coverage is handling the mocking of singletons that are implemented using static method calls.
Let’s look at how we can mock singleton behavior using three common Java testing libraries Mockito, EasyMock and JMockit.
Part 1: Write Code to Test
To start with, we need a simple contrived example. In this example, we have a class ClassUnderTest that accesses a singleton Singleton and then, based on the return value, calls a method in DummyApiClient.
The issue is, we need to be able to mock the behavior of the static instance of Singleton in order to test ClassUnderTest.
public class ClassUnderTest { private DummyApiClient dummyApiClient; public ClassUnderTest(DummyApiClient dummyApiClient){ this.dummyApiClient = dummyApiClient; } public void methodUnderTest(){ if(Singleton.getSingleton().getBool()){ dummyApiClient.doPositive(); } else { dummyApiClient.doNegative(); } }}
import java.util.Random;public class Singleton { static Singleton singleton; static { singleton = new Singleton(); } public static Singleton getSingleton(){ return singleton; } public Boolean getBool(){ return new Random().nextBoolean(); }}
public class DummyApiClient { public void doPositive(){ System.out.println("positive");}; public void doNegative(){ System.out.println("negative");};}
Wow! It’s now possible to mock static methods with mockito, without the additional dependency of PowerMock! Since version 3.4 of Mockito (PR), we can mock static methods using the mockStatic command. (examples)
First, let’s add the required dependencies to our pom.xml file. We need to use JUnit and mockito-inline (regular mockito-core will not work).
As of the time of writing, EasyMock does not support mocking of static methods without the use of an additional library; In our case, we will use PowerMock to support mocking static methods.
First, let’s update our pom.xml to reflect the libraries we are using:
import org.junit.Before;import org.junit.Test;import org.junit.runner.RunWith;import org.powermock.api.easymock.PowerMock;import org.powermock.core.classloader.annotations.PrepareForTest;import org.powermock.modules.junit4.PowerMockRunner;import static org.easymock.EasyMock.expect;import static org.powermock.api.easymock.PowerMock.mockStatic;@RunWith(PowerMockRunner.class)@PrepareForTest(Singleton.class)public class ClassUnderTestTest { DummyApiClient dummyApiClient; Singleton singletonMock; ClassUnderTest unit; @Before public void beforeEach(){ dummyApiClient = PowerMock.createMock(DummyApiClient.class); singletonMock = PowerMock.createMock(Singleton.class); mockStatic(Singleton.class); expect(Singleton.getSingleton()).andReturn(singletonMock); unit = new ClassUnderTest(dummyApiClient); } @Test public void testMethodUnderTestPositive(){ expect(singletonMock.getBool()).andReturn(true); dummyApiClient.doPositive(); PowerMock.expectLastCall(); PowerMock.replayAll(); unit.methodUnderTest(); } @Test public void testMethodUnderTestNegative(){ expect(singletonMock.getBool()).andReturn(false); dummyApiClient.doNegative(); PowerMock.expectLastCall(); PowerMock.replayAll(); unit.methodUnderTest(); }}
Resetting Mocks: Note how mockStatic(Singleton.class); doesn’t have a corresponding reset call. This is because PowerMock resets mocks using the @PrepareForTest annoation. (stack overflow post)