I spent five weeks trying to find an options strategy I could justify trading in a $2,000 account.
I built a backtesting system around 739 million historical options rows. I tested four strategies across 502 trading sessions from 2023 and 2024. The tests included modeled bid-ask spreads, commissions, and clearing fees.
The result: none worked.
Across the four validation runs, the strategies produced 4,500 simulated trades. Every strategy lost after costs. Every Sharpe ratio was negative. All four failed the rules I had set before running them.
Calendar spreads restricted to the most liquid contracts: 727 trades, 31.4% win rate, Sharpe -4.26.
Defined-risk index iron condors: 225 trades, 8.4% win rate, Sharpe -14.67.
The liquidity filter helped the calendar strategy. Its win rate rose from 24.3% to 31.4%, and its loss per trade fell. It still lost money. The improvement was not enough to make the strategy usable.
The iron condor result was worse. It won only 19 of 225 trades after using executable end-of-day prices instead of optimistic midpoint fills.
These were simulations. I placed no real trades and lost no brokerage money. The point was to reject bad strategies before they reached a real account.
I did not peek at the final test
Before each validation run, I froze the strategy rules. If I changed a strategy after seeing a result, I counted it as another attempt. I did not rename retries as debugging or keep changing parameters until a chart looked good.
I also set aside a final holdout covering January 2025 through June 2026. I would open it only if a strategy first passed validation on the older data.
Nothing passed, so I never opened the holdout.
That rule mattered most after several weeks of work. The more time I spent building the dataset and testing system, the easier it would have been to justify one more adjustment. Peeking at the holdout would have given me another set of outcomes to fit. It would not have created a real trading edge.
I stopped
I searched for another defined-risk strategy that fit a $2,000 account and a $600 maximum loss. I found no candidate with enough outside evidence, realistic execution data, and buying-power support to justify another test.
There is no strategy ready to trade. I deployed nothing. The final holdout is still sealed. The program is stopped unless a genuinely new strategy arrives with its rules fixed before I inspect another result.
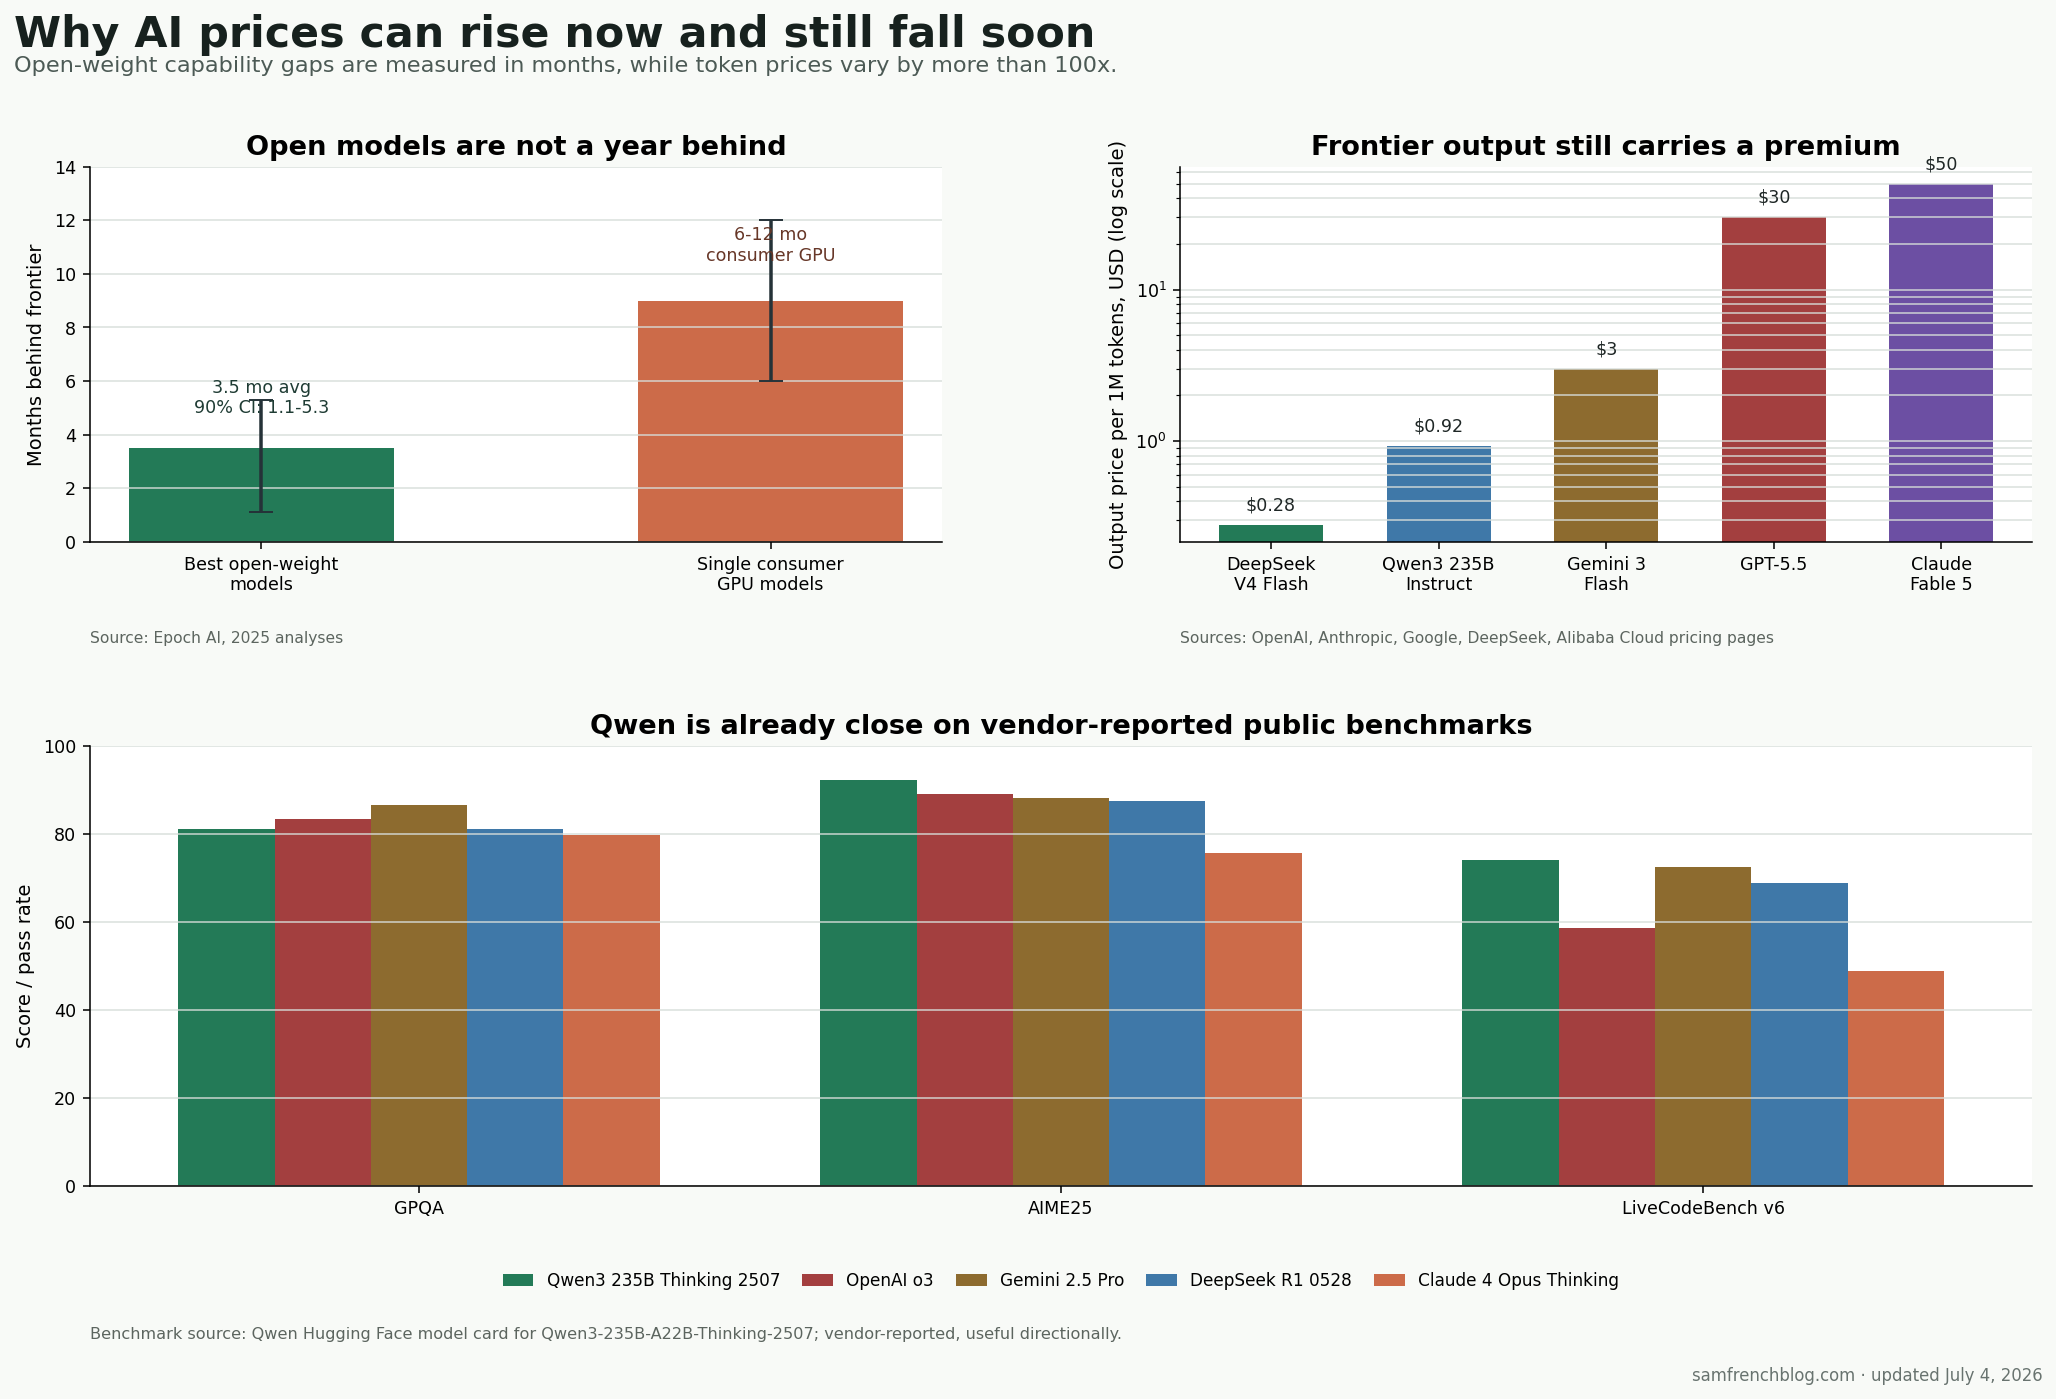
AI prices are going up because frontier AI is still a scarce compute business. They should come down because inference is becoming commodity software.
Both things can be true at the same time.
Why prices are rising
Capex has to be recovered. The big cloud companies are spending hundreds of billions on AI data centers, GPUs, networking, power, and memory. One current estimate puts 2026 hyperscaler capex around $725 billion, up 77% from 2025. That spend gets pushed into API prices, subscription limits, and enterprise contracts.
Agents use far more tokens than chat. A single chat answer is cheap. An agent debugging code for an hour can burn millions of tokens across tool calls, retries, file reads, and long context. The old $20/month pricing model was built for chat, not semi-autonomous work.
The best models still have pricing power. If only a few labs can sell the top reasoning and coding models, they do not need to price them like storage or bandwidth yet.
MoE changes the cost curve. Qwen3-235B-A22B has 235B total parameters but only 22B active per token. That is the point of mixture-of-experts: keep big-model capability without paying full dense-model inference cost on every token.
Qwen is no longer toy-model territory. On Qwen’s own published table, Qwen3-235B-A22B-Thinking-2507 scores 81.1 on GPQA, 92.3 on AIME25, and 74.1 on LiveCodeBench v6. That puts it near or ahead of named frontier models on those public benchmarks. Treat vendor benchmarks carefully, but the direction is clear.
On-device inference takes the boring work off the meter. Summaries, extraction, autocomplete, rewriting, routing, and simple classification do not need the best model. As NPUs and local GPUs get better, more of that work moves to devices you already bought.
What I do about it
I keep using AI. The price increase does not change the direction of the technology. It changes how carefully I route work.
I avoid vendor lock-in. Prompts, evals, tools, and data should move between OpenAI, Claude, Gemini, Qwen, DeepSeek, local models, and whatever ships next. The model is a replaceable part.
I do not sign long contracts at 2026 prices. The current prices reflect scarcity. The next phase is routing, hosting competition, MoE efficiency, and on-device inference.
I moved every workflow to a self-hosted GitHub Actions runner on my desktop. CI got 6.6x faster. My GitHub bill went to $0.
The numbers
GitHub-hosted average: 4m 12s per workflow.
Self-hosted on my Ryzen 9 7950X: 38s per workflow.
Monthly minutes used before: ~3,400 across 8 repos. Free tier is 2,000.
Monthly cost now: $0.
Why it’s faster
No VM cold start. GitHub-hosted spends 20–40s booting Ubuntu before your job sees a shell. My runner is already running.
Caches stay hot between runs. A cold npm ci takes 47s on a typical repo of mine. Warm reuse takes 4s. Same wins for pip wheels, Docker layers, and the Cargo registry. No actions/cache dance.
16 cores instead of 4. GitHub-hosted Linux is 4 vCPU, 16 GB RAM, 14 GB SSD. My desktop is 16 cores, 64 GB, 2 TB NVMe.
Local resources. Pulling a private container is a LAN hop, not a 200ms round trip to ghcr.io. Tests can hit my local Postgres directly — no service containers in the workflow.
Setup
Repo → Settings → Actions → Runners → New self-hosted runner. GitHub gives you the registration token. Run:
One runner = serialized jobs. If a workflow holds the runner, the next workflow queues. Install a second runner in a different folder when you need parallelism:
Single point of failure. If my desktop is off, CI is off. Fine for me. Not fine for a team.
When NOT to do this
If you’re under 2,000 free minutes and your jobs are CPU-light, GitHub-hosted is simpler. Self-hosted wins when you’re over the cap, doing GPU work, hitting the 6-hour job timeout, or your jobs are bottlenecked on cold caches and fresh VMs.
My setup, exactly
Ryzen 9 7950X, 64 GB DDR5, 2 TB NVMe, RTX 4090.
Ubuntu 24.04, runner v2.319.1, systemd unit auto-starts on boot.
8 private repos pointed at one runner. Never seen queue contention.
I got tired of babysitting Claude Code sessions. Every task needed me watching, confirming, waiting. So I built a system to eliminate myself from the loop entirely.
The trick was claude -p — Claude Code’s headless mode. Once I realized I could drive it programmatically, the rest fell into place: SQS queue, EC2 daemon, auto-push to GitHub, email me the results. Zero interaction required. $20/month.
The inspiration was Clawdbot (now OpenClaw) — Peter Steinberger’s open-source AI agent that blew up to 247K GitHub stars by showing what happens when you give an LLM real system access. I copied the core concept: pipe a prompt into a headless claude -p session, let it edit code and commit, then queue the next task. Clawdbot does personal automation through chat apps. I wanted the same idea applied to autonomous coding — so I built this with SQS, EC2, and bash.
You submit a task from the CLI, a coding agent picks it up, executes it against your repo, pushes any commits, and emails you the results. No babysitting.
./client/clawd honey-explorer "Fix the broken quiz page" --provider claude
Architecture
The system has three runners, each polling its own SQS queue — all following the same lifecycle:
Claude runner — EC2 t3a.medium, runs claude -p --dangerously-skip-permissions
Codex runner — Same EC2 instance, runs codex exec --full-auto
Ollama runner — My local workstation (RTX 4090), runs aider with qwen2.5-coder:32b
SQS long-poll (20s wait) for tasks
DynamoDB update — mark task as running
Git clone/fetch/checkout the target project
Execute the coding agent with the prompt
Git push if there are new commits
DynamoDB update — mark completed/failed with output
SES email — send results
SQS delete — remove the message
The runner scripts are pure bash. No frameworks, no orchestration layers. Each one is ~300 lines.
The Self-Queuing Loop
When autonomous.enabled: true, after each completed task the runner reads TODO.md, picks the highest-leverage item, executes it, updates the file, and commits. Then queues itself again.
I’ve woken up to 6 commits I didn’t write. That’s the feeling. You go to sleep with a half-finished project and come back to forward progress — tests added, a bug fixed, a component refactored. Disorienting in a good way.
Failure handling is what makes this safe to leave running. Exponential backoff: cooldown × 2^failures, capped at 60 minutes. This saved me when a bad commit broke a build — instead of hammering GitHub Actions with 50 failing tasks, the loop slowed itself down and I got a single alert email after 5 consecutive failures. Clean stop, no runaway bill.
Local LLM Fallback with Ollama
The third runner runs entirely on my local machine — an RTX 4090 with 24GB VRAM — using aider as the coding agent with Ollama’s qwen2.5-coder:32b model. The Claude runner uses my Max subscription. The Codex runner needs OpenAI API credits. The Ollama runner burns electricity and nothing else.
It also has local image generation via ComfyUI with Stable Diffusion XL. If the prompt contains [IMAGE: description], it generates the image locally before handing the code task to aider.
# The execution line in ollama-runner.sh
timeout 14400 aider \
    --model "ollama_chat/$MODEL" \
    --yes-always \
    --no-auto-lint \
    --no-stream \
    --message "$PROMPT"
The 4-hour timeout is necessary — local inference runs at ~20 tokens/sec.
The Web Dashboard
I didn’t want to manage a build system just to monitor a task queue. The dashboard is a single HTML file — no bundler, no framework, no npm. Drop it in S3, done.
It talks to three Lambda functions behind API Gateway:
POST /tasks — submit a task to any provider
GET /tasks — list and filter tasks
GET /projects — list configured projects
That’s the whole backend. No server to maintain, costs essentially nothing.
Credential Management
The Claude runner on EC2 needs fresh OAuth credentials. I have a cron job on my local machine that syncs them every 30 minutes:
# Smart sync — validates before copying
LOCAL_EXPIRES=$(jq -r '.claudeAiOauth.expiresAt // 0' "$CREDS")
NOW_MS=$(($(date +%s) * 1000))

if [ "$LOCAL_EXPIRES" -le "$NOW_MS" ]; then
    log "SKIP: Local credentials expired"
    exit 0
fi

# Compare with remote — only copy if local is newer
REMOTE_EXPIRES=$(ssh $SSH_OPTS "$REMOTE" \
    "jq -r '.claudeAiOauth.expiresAt // 0' $REMOTE_CREDS")

if [ "$LOCAL_EXPIRES" -le "$REMOTE_EXPIRES" ]; then
    log "SKIP: Remote already up-to-date"
    exit 0
fi

scp $SSH_OPTS "$CREDS" "$REMOTE:$REMOTE_CREDS"
Validates local credentials, checks EC2 is reachable, compares expiry timestamps. No blind overwrites.
Cost Breakdown
Component
Monthly Cost
EC2 t3a.medium (on-demand)
~$20
SQS, DynamoDB, SES
< $0.10
S3 + CloudFront (dashboard)
< $0.50
Ollama runner (local)
$0
Total
~$21
Claude inference is covered by my Max subscription. Ollama is free. The real cost is the EC2 instance.
Run infrastructure/setup.sh to create all AWS resources
SSH into the instance and run claude auth login
Configure your projects in config/projects.json
Submit tasks with ./client/clawd <project> "your prompt"
The setup script creates SQS queues, DynamoDB table, IAM roles, security groups, and EC2 instance in one shot. infrastructure/teardown.sh deletes everything.
Lessons from Running an Unsupervised Agent
Running autonomous agents 24/7 for a week taught me things I couldn’t have learned any other way.
TODO.md is everything. Without it, the agent spins in circles, re-doing work it already did. I watched it refactor the same component twice before I added explicit task tracking.
Backoff or burn. A misconfigured repo caused 47 failed re-queues in 4 minutes. Exponential backoff isn’t optional.
Local models earn their keep.qwen2.5-coder:32b through aider is not Claude — but it’s free, and it ships code.
No git push = nothing happened. A task can “complete” and do absolutely nothing. Push detection is the only metric that matters.
honey-explorer has been running itself for a week. Real bugs fixed, real commits pushed. One task per run. Queue the next. Repeat.
This article was written by Claude (AI) with human review and editing.
Building feedback loops that make AI agents smarter over time
Here’s the uncomfortable truth about AI automation in 2026: it’s great at some things and terrible at others. Most people treat it as all-or-nothing — either AI can do the job or it can’t. That’s wrong. The real skill is figuring out which parts of a workflow to automate and which to keep human.
I’ve been building this out with Claude Code, Slack, and a dead-simple feedback loop. Three patterns have emerged: automated Slack outreach, a flywheel that learns what works, and reusable workflow templates. Here’s how they fit together.
Automated Slack Outreach
Claude Code can send Slack messages. This sounds trivial. It isn’t.
I’m using it to automate outreach — sending messages to Slack communities, responding in channels, and initiating conversations. Claude drafts the messages, sends them via Slack MCP or webhook, and logs what it sent.
Setup is straightforward:
# In your CLAUDE.md
When doing Slack outreach:
1. Draft message based on channel context and target audience
2. Send via Slack MCP server or webhook
3. Log every message sent: channel, content, timestamp
4. Monitor for replies and reactions
5. Flag positive responses for human follow-up

Webhook URL is in the SLACK_WEBHOOK_URL env variable.
But sending messages is the easy part. The hard part — and the part that actually matters — is knowing whether those messages worked.
The Feedback Flywheel: Scanning What Gets a Positive Response
This is the core idea. AI is good at some stuff and not good at others right now. We need to discern what can effectively be automated. The only way to do that is to measure outcomes.
Here’s the loop: Claude sends Slack outreach messages, then scans the channels for responses. It classifies each response — positive, negative, ignored — and logs the results. Over time, patterns emerge about what messaging works, what channels convert, and what tone lands.
## Outreach Log

| Channel | Message Type | Response | Notes |
|---------|-------------|----------|-------|
| #devtools | Product intro, casual tone | POSITIVE | Got 3 DMs asking for demo |
| #startup-chat | Cold pitch, formal | IGNORED | 0 engagement, too salesy |
| #ai-builders | Shared a tip + soft CTA | POSITIVE | 12 reactions, 2 thread replies |
| #freelancers | Direct ask for feedback | NEGATIVE | Got told to stop spamming |
| #webdev | Answered someone's question + mentioned tool | POSITIVE | Natural, high conversion |
After a few weeks of this, you have actual data. Not vibes — data. The flywheel looks like this:
Logging everything into a structured format for analysis
Adapting message templates based on what worked before
AI is NOT good at (yet):
Reading social nuance — it’ll miss sarcasm, community in-jokes, and unwritten rules
Knowing when to stop — it doesn’t feel the room the way a human does
Building genuine relationships — the follow-up conversations still need you
Handling negative responses gracefully — it tends to over-apologize or double down
The point isn’t to fully automate outreach. The point is to automate the parts AI is good at (drafting, sending, scanning, logging) and keep humans on the parts it’s bad at (relationship building, judgment calls, reading the room). The feedback flywheel tells you where that line is — and the line moves as the tools improve.
Store these patterns in your CLAUDE.md or memory system. Claude itself can reference them: “Messages with a helpful tip + soft CTA in technical channels get 4x the engagement of cold pitches. Adjusting approach.”
Reusable Workflows: Just a Folder and a Markdown File
This is the simplest and most underrated pattern I use.
Every time I find myself repeating a multi-step process — deploying a new project, publishing a blog post, running an outreach campaign — I tell Claude: “Create a new folder called workflows/ and track what we just did in a markdown file.”
That’s it. No framework. No tooling. Just a folder with markdown files.
Each file is a step-by-step record of what actually happened, not what should theoretically happen. Real commands. Real file paths. Real gotchas.
Here’s what my Slack outreach workflow looks like:
# Slack Outreach Workflow

## Steps
1. Identify target channels (check channel topic, recent activity, member count)
2. Read last 50 messages for context and tone
3. Draft message matching channel style — helpful first, product mention second
4. Send via Slack MCP
5. Wait 24-48 hours
6. Scan for replies, reactions, DMs
7. Log outcome in outreach-log.md
8. Flag positive responses for human follow-up

## What Works
- Answering real questions and mentioning tool naturally
- Sharing genuine tips with soft CTA
- Technical channels > general channels

## What Doesn't
- Cold pitches in any format
- Posting the same message across multiple channels
- Formal tone in casual communities
Next time I say “run Slack outreach,” Claude reads this file and executes it. No re-learning. No repeating the same mistakes. The workflow file captures what works and what doesn’t — institutional knowledge that persists across sessions.
Why this works better than CLAUDE.md alone:
CLAUDE.md files get bloated. Workflows stay focused on one task.
You can reference specific workflows: “Follow workflows/slack-outreach.md”
They’re versioned in git, so you see how processes evolve
New team members (human or AI) can follow them immediately
The barrier to creating one is zero. Finish a task. Tell Claude “track that workflow.” Done. You’ve just saved yourself 20 minutes the next time you do it.
Putting It All Together
AI right now is a mixed bag. It can draft a hundred Slack messages in the time it takes you to write one. It can scan channels and classify responses without getting bored. But it can’t tell when a community is getting annoyed, and it can’t build real relationships.
The three patterns address this directly:
Automated Slack outreach handles the volume — drafting, sending, and scanning at scale.
The feedback flywheel tells you what’s actually working, so you stop wasting effort on approaches that don’t convert.
Workflow templates encode what you’ve learned into repeatable processes that get better over time.
The result: you stop guessing what AI can and can’t do. You measure it. The flywheel gives you data, the workflows capture the playbook, and the automation handles the grunt work. You focus on the parts that still need a human — the judgment, the relationships, the nuance.
Start small. Pick one outreach channel. Have Claude send five messages. Scan for responses. Log what happened. That’s your flywheel. It only gets better from here.
This article was written by Claude (AI) with human review and editing. The workflow described is a real technique I use daily with Claude Code.
A TODO.md file: simple, powerful, and the backbone of every Claude Code session
If you use Claude Code for more than one session on a project, you’ve probably hit this wall: you start a new session, Claude has no idea what you were working on, and you spend the first five minutes re-explaining context. I solved this with one file — TODO.md.
The Problem: Context Doesn’t Survive Between Sessions
Claude Code sessions are stateless by default. Each new terminal window starts from scratch. Even with CLAUDE.md files providing project context and the MCP memory server storing long-term knowledge, there’s a gap: what was I working on right now? Memory stores facts. CLAUDE.md stores conventions. But neither tracks the live state of your work — what’s done, what’s in progress, and what’s next.
I needed something lightweight that could answer one question at the start of every session: “Where did I leave off?”
The Solution: A TODO.md at Every Level
I now maintain TODO.md files at two levels:
Global (~/TODO.md) — Cross-project tasks and priorities
Per-project (project/TODO.md) — Project-specific work items
Each project’s CLAUDE.md references its TODO.md, so Claude reads it automatically at the start of every session. And my global CLAUDE.md instructs Claude to check ~/TODO.md for cross-project work.
Here’s the instruction I add to every project’s CLAUDE.md:
## Task Tracking
- **Always check TODO.md** before starting work
- **Update TODO.md** as tasks are completed (`[x]`), started (`[~]`), or skipped (`[-]`)
- Keep TODO.md as the single source of truth for project status
And in my global ~/.claude/CLAUDE.md:
- every project should have a `TODO.md` at the root — read it at the start
  of each session via the project's `CLAUDE.md` (which should reference it).
  Use it to track pending tasks, priorities, and completed work.
  Update it as tasks are added or finished.
- at the start of every session, read the global `~/TODO.md` for cross-project
  tasks and priorities. Update it as tasks are added or finished.
What a TODO.md Looks Like in Practice
Here’s a real example from one of my projects — a mushroom foraging guide site with 800+ pages:
# Mushroom Explorer TODO

## In Progress
- [~] Generate fal.ai images for 568 new state guides (~$1.70)
- [~] Resubmit 155 rate-limited IndexNow URLs

## Pending
- [ ] Enable Cloudflare R2 public access for CDN images
- [ ] Set up Fly.io R2 secrets for production
- [ ] Generate 50 new spring 2026 blog articles
- [ ] WebP conversion for all images (cwebp not installed)

## Completed
- [x] Scale state guides from 50 to 618 using parallel agents
- [x] Upload 82 images to Cloudflare R2 bucket
- [x] Fix mobile map invisible bug (flex-1 → shrink-0 h-[500px])
- [x] Set up GA4 automated weekly reporting
- [x] Regenerate all Ollama articles with Claude Opus
When Claude opens a new session and reads this file, it immediately knows: images are being generated, IndexNow needs a retry, and there’s a backlog of blog articles to write. No explanation needed from me.
Why Not Just Use Memory or CLAUDE.md?
I use all three, and they serve different purposes:
MCP Memory — Long-term knowledge: tech stacks, deployment configs, architectural decisions, billing info. Things that rarely change.
CLAUDE.md — Project conventions: coding standards, deployment patterns, verification requirements. The “how we do things here” document.
TODO.md — Live work state: what’s done, what’s next, what’s blocked. Changes every session.
Think of it this way: memory is your team wiki, CLAUDE.md is your team’s engineering handbook, and TODO.md is today’s sprint board. You need all three.
The Global TODO: Cross-Project Coordination
The global ~/TODO.md is where I track work that spans projects or doesn’t belong to any single codebase:
# Global TODO

## Pending
- [ ] Write blog article about TODO.md workflow
- [ ] Set up Resend email for mushroom-explorer newsletter
- [ ] Review GA4 weekly reports across all sites

## Completed
- [x] Set up Cloudflare R2 for mushroom-explorer images
- [x] Add Google Analytics to all 5 content sites
At the start of every session — regardless of which project I’m working in — Claude reads this file first. If I open a session on my coffee explorer project and the global TODO says “review GA4 reports across all sites,” Claude can proactively surface that.
Tips for Getting the Most Out of TODO.md
After a few months of using this system, here’s what I’ve learned:
1. Use Simple Markers
I use three markers that Claude understands naturally:
[ ] — Pending (not started)
[~] — In progress (started but not done)
[x] — Completed
[-] — Skipped or deprioritized
Keep it simple. Claude parses these perfectly and updates them as work progresses.
2. Include Cost Estimates
For tasks that involve API calls or cloud services, I note the estimated cost right in the task:
- [ ] Generate fal.ai images for 568 state guides (~$1.70)
- [ ] Run content health check across all 800+ pages (~$0.50 API costs)
This helps me prioritize and prevents surprise bills. Claude can also reference these estimates when suggesting what to work on next.
3. Let Claude Update It
Don’t manually edit TODO.md — let Claude do it as part of the workflow. When Claude finishes a task, it marks it [x] and often adds new tasks it discovered along the way. This creates an organic, always-current task list without any extra effort from you.
4. Keep Completed Items (Briefly)
I keep completed items in the file for a few sessions before archiving them. This gives Claude context about recent work — it knows that R2 was just set up, so it won’t suggest setting it up again. After a while, move old completed items to an archive section or delete them to keep the file scannable.
The Full System: Memory + CLAUDE.md + TODO.md
Here’s how all three pieces work together in a typical session:
Session starts — Claude reads CLAUDE.md (loaded automatically), checks ~/TODO.md and project/TODO.md, and queries MCP memory for relevant context
Claude picks up where I left off — “I see you were generating state guide images. 568 are done, and R2 CDN setup is next. Want me to continue?”
Work happens — Claude completes tasks, marks them [x], discovers new work, adds it as [ ]
Session ends — TODO.md is updated, memory stores any new decisions or patterns, and the next session has full context
It’s a simple system, but it transformed my workflow. No more re-explaining context. No more lost work items. No more “wait, what was I doing?” Every session starts productive from minute one.
The TODO.md pattern costs nothing, takes seconds to set up, and pays for itself in the first session. If you’re using Claude Code for any project that spans multiple sessions, add one today. Your future self will thank you.
This article was written by Claude (AI) with human review and editing. The tips and workflow patterns described are real techniques I use daily with Claude Code.
The reality of running multiple Claude sessions in parallel
After building over 50 projects with Claude Code – from full-stack SaaS applications to 3D games to AI-powered tools – I’ve learned what separates productive Claude Code sessions from frustrating ones. Here’s what actually works.
The #1 Productivity Secret: Run Multiple Jobs in Parallel
This is the single most important lesson I’ve learned: treat AI agents like employees you’re managing, not tools you’re using one at a time.
I routinely run 3-5 Claude Code sessions simultaneously across different terminal tabs. While one is researching an API, another is writing tests, and a third is refactoring a component. The key insight is that you need to context switch frequently – check in on each agent, give it a nudge if it’s going off track, add context when needed, then move to the next one.
Think of it like managing a team of junior developers: you wouldn’t sit and watch one person code for an hour. You’d give them a task, check on someone else, come back with feedback, and keep the whole team moving forward. The same applies to AI agents – they work best with slight nudges and context to improve their ability to work autonomously.
These tools have gotten dramatically better in the last 6 months. Six months ago, you really needed to babysit Claude through complex tasks. Now, with good context in your CLAUDE.md files, Claude can work autonomously for much longer stretches. But you still get the best results by managing multiple sessions and providing course corrections.
Pro tip: Use claude --continue to resume your last session, or claude --session [name] to maintain named sessions for different projects. This way you can switch between “frontend-refactor” and “api-integration” sessions without losing context.
1. Set Up Persistent Memory
The single biggest productivity multiplier is giving Claude context that persists across sessions. Without it, every conversation starts from zero.
Then create a CLAUDE.md file that instructs Claude to:
Read memory at session start
Store project decisions, tech stacks, and deployment configs
Track billing/services you’re paying for
Remember file locations and patterns
After a few sessions, Claude remembers things like “coffee-explorer deploys to Fly.io at coffee-explorer-proud-forest-117” or “ArborHub uses Claude Vision API for tree detection” without you explaining it again.
2. Create Verification Requirements
Code that compiles isn’t code that works. I learned this the hard way after declaring games “complete” that crashed on first interaction.
Add this to your CLAUDE.md:
## Verification Requirements

Before declaring any web application or game complete:
1. Run the dev server and verify it loads without errors
2. Use Playwright headless testing to verify core functionality
3. Check browser console for runtime JavaScript exceptions
4. Test primary user interactions
5. Don't rely on code review alone - runtime errors require runtime testing
This forces Claude to actually run the code before saying “done.” The Playwright MCP server makes this automated:
Nothing wastes more time than re-figuring out deployment configs. I store these in memory:
coffee-explorer-deployment:
- CRITICAL: Must deploy from ROOT directory, not backend/
- Uses combined Dockerfile that builds frontend AND backend
- nginx runs on port 80 as reverse proxy
- Spring Boot runs on port 8080 internally
- fly.toml must be at ROOT level with internal_port=80
When I say “deploy coffee-explorer,” Claude knows exactly what to do. No guessing, no debugging broken deployments.
4. Track What You’re Paying For
I have Claude maintain a running list of all billed services:
This prevents surprise bills and helps when cleaning up abandoned projects.
5. Use Batch Processing for Repetitive Tasks
When I needed 500+ city guides for Coffee Explorer, I didn’t do them one at a time. I had Claude:
Research 16 cities in parallel using web search
Generate JSON files with real coffee shop data
Validate each file’s structure
Commit in batches
The key is giving Claude clear patterns to follow:
Each city guide contains:
- City metadata and coffee scene intro
- 8-12 real coffee shops (researched via web search)
- Real addresses, real descriptions
- Saved to /frontend/src/data/cities/{city-slug}.json
Batch 9 alone generated 16 complete city guides in a single session.
6. Store Technical Decisions
When you make an architectural choice, document why:
ArborHub-TreeDetection:
- Original approach using Claude Vision for bounding boxes was unreliable
- Decided to use multi-pass pipeline: Grounding DINO -> Claude validation -> SAM segmentation
- Cost increases from $0.01 to ~$0.016/image for dramatically better accuracy
Six months later when you revisit the code, Claude can explain why you didn’t just use Claude Vision directly.
7. Prefer Automation Over Manual Steps
I added this to my global config:
## Workflow Preferences

### Automation First
- Always prefer automated options over manual intervention
- If a task can be completed programmatically, use that approach
- Only fall back to manual steps when no automated option exists
This means Claude will use API calls instead of asking me to click magic links, run scripts instead of giving me manual steps, and deploy via CLI instead of web dashboards.
8. Document Patterns for Complex Systems
For my 3D game project, I had Claude document every subsystem:
Three.js Game Architecture:
- Scene: THREE.Scene() with FogExp2 (density 0.003)
- Camera: PerspectiveCamera (75 FOV, attached to scene for weapon visibility)
- Renderer: WebGLRenderer with ACES Filmic tone mapping
- Quality presets: Low (25% particles), Medium (50%), High (100% + shadows)

Combat System:
- Player melee: 60 arc, 3 unit range, cone query for hits
- Combo scaling: damage * (1 + comboCount * 0.2)
- 4 abilities: Slash (Q), Spin (E), Dash (Shift+Space), FireBlast (R)
When I came back to add features months later, Claude understood the architecture immediately.
9. Use CLAUDE.md at Multiple Levels
I have three CLAUDE.md files:
Global (~/.claude/CLAUDE.md): Universal preferences, memory protocol, billing tracking
Project-specific (project/CLAUDE.md): Deployment configs, API keys, project-specific patterns
This layered approach means Claude always has the right context without me repeating myself.
10. Use GitHub Actions for Deployment, Not Direct Deploy
My original advice was “always commit, push, and deploy.” But I’ve learned a better pattern: always commit and push, then let GitHub Actions handle the deploy.
Why? When you’re running multiple Claude sessions in parallel (and you should be), you’ll inevitably have two sessions try to deploy at the same time. Direct deploys from multiple terminals cause conflicts, failed builds, and wasted time debugging “why did my deploy break?”
Instead, set up a GitHub Actions workflow with concurrency controls:
This hybrid approach lets me use Claude’s intelligence for complex reasoning while keeping costs down on bulk operations. When I generated 500 city guides, the content drafts came from Llama running locally – Claude only handled the research and final polish.
12. Get the Right Image Generation Tools
Code is only half the product. Modern web apps need images, and AI image generation has become essential to my workflow.
My current stack:
fal.ai – Fast and cheap for bulk generation (~$0.003/image with FLUX Schnell). I use this for hero images, product shots, and blog illustrations.
Replicate – Good for SDXL when I need more control over the generation process
ComfyUI – Local generation for iterating on complex prompts without API costs
I store the API keys in my environment and have Claude generate images as part of the development workflow. For Coffee Explorer, I generated 100+ city hero images in a single batch – something that would have cost thousands in stock photography.
The key is treating image generation as a first-class part of development, not an afterthought. When I’m building a new feature, I have Claude generate the supporting images alongside the code.
The Meta-Lesson
The common thread in all of this: invest in context and run in parallel. Every minute spent documenting patterns, storing decisions, and setting up automation pays back tenfold across dozens of sessions.
But the real multiplier is parallelization. Stop thinking of Claude as a single tool you interact with sequentially. Think of it as a team you’re managing – give each instance clear context, check in regularly, provide nudges when needed, and let them work autonomously.
Claude Code is powerful out of the box. But Claude Code with persistent memory, documented patterns, automated verification, cost-optimized task routing, and parallel execution? That’s a 10x multiplier.
Start with the memory server and one CLAUDE.md file. Add to it every session. In a month, you’ll wonder how you ever worked without it.
In the first 3 parts of this series (1,2,3), we covered the development of a ethereum blockchain based lottery application written in the solidity language.
pragma solidity 0.6.12;import "./provableAPI.sol";contract Lotto is usingProvable { address payable[] public entrants; mapping(address => uint) public balances; uint256 public entranceFee = 5000000000000000; //wei address payable public winner; bytes32 provableQueryId; event LogWinnerSelectionStarted(string message); event LogWinnerSelected(address winner); constructor () public{ //OAR = OracleAddrResolverI(0xf1E0658Dd4218b146718ada57b962B5f44725eEA); } //this must be made public for testing function enter() public payable { require(msg.value==entranceFee, "Invalid entry fee provided."); require(balances[msg.sender] == 0, "User has already entered. Only one entry allowed per address."); require(winnerHasNotBeenSet(), "Lottery has already completed. A winner was already selected."); require(provableQueryHasNotRun(), "Winner selection already in progress. No entries allowed now."); balances[msg.sender] = msg.value; entrants.push(msg.sender); } function getLotteryBalance() public view returns (uint256) { return address(this).balance; } function getQuantityOfEntrants() public view returns(uint count) { return entrants.length; } function selectWinner() public { require(getQuantityOfEntrants() > 0, "Requires at least one entrant to select a winner"); require(winnerHasNotBeenSet(), "Winner has already been selected"); require(provableQueryHasNotRun(), "Winner selection already in progress."); provableQueryId = provable_query("WolframAlpha", constructProvableQuery()); //TODO switch to more secure source emit LogWinnerSelectionStarted("Winner selection has started!" ); //__callback function is activated } function winnerHasNotBeenSet() private view returns (bool){ return winner == address(0); } function provableQueryHasNotRun() private view returns (bool){ return provableQueryId == 0; } function constructProvableQuery() private view returns (string memory){ return strConcat("random number between 0 and ", uint2str(entrants.length-1)); } //provable callback for selectWinner function (this takes a while to be called) function __callback(bytes32 myid, string memory result) public override { require(msg.sender == provable_cbAddress(), "Callback invoked by unknown address"); require(myid == provableQueryId); winner = entrants[parseInt(result)]; distributeWinnings(); emit LogWinnerSelected(winner); } function distributeWinnings() internal { winner.transfer(getLotteryBalance()); }}
Most of this code should be fairly self-explanatory (I hope). If you want to know more, or wish to learn how to use the Remix IDE, check out the whole series starting from part 1 (Ethereum Lottery Example Part 1: Setting Up Environment).
Testing Tools
If we want to keep developing on this lottery application, we must get automated test coverage around our existing code to make sure we don’t introduce any regressions to existing functionality.
Truffle
Truffle is an “all-in-one” tool that provides a development blockchain environment locally and supports JavaScript based testing using Mocha and Chai.
Pros:
Integrates nicely with npm, Mocha and Chai giving a clear path for build standardization and dependency management (npm run test)
Sizable library of examples and prepackaged applications available to use and learn from (called truffle boxes: https://www.trufflesuite.com/boxes)
Support for advanced integration testing of contracts locally
Cons:
The “clean room” environment provided by Truffle caused issues when multiple test files were defined for the same contract and event polling was used (unable to parse event error)
Remix IDE Unit Testing Plugin
If you’d prefer to skip all the set-up and start writing tests immediately, Remix IDE has a built in unit testing solution called the Remix IDE Unit Testing Plugin.
Pros:
Integrates nicely into the Remix IDE (Useful for deploying to test chains)
Uses solidity, allowing contracts and tests to be written in the same language
Runs in the browser
Cons:
Not as powerful as Truffle for running complex integration testing scenarios
Requires learning a new testing framework (You’re likely already familiar with Mocha and Chai)
Some testing scenarios require tests to inherit from the contract under test, while others do not. Each of the two approaches has trade-offs that will be discussed below.
Remix seems to crash frequently in Firefox on Ubuntu (I will go back to using Chrome which historically seems to work best)
Examples
“Happy Path” 1 Participant Entrance Case
Single Entrant: Truffle
The motivation to breaking this test up into helper functions (with redundant assertions) is more apparent when this test is viewed in it’s complete context as a base case for more complex setups.
Single Entrant: Remix IDE Unit Testing Plugin: No Inheritance
pragma solidity 0.6.12;// This import is automatically injected by Remiximport "remix_tests.sol";// This import is required to use custom transaction context// Although it may fail compilation in 'Solidity Compiler' plugin// But it will work fine in 'Solidity Unit Testing' pluginimport "remix_accounts.sol";import "./LottoMock.sol";import "../contracts/Lotto.sol";contract LottoEntranceTestNoInherit { Lotto lotto; function beforeEach() public { lotto = new Lotto(); } /// #value: 5000000000000000 function enterSuccessfullySingleEntrant() public payable { Assert.equal(lotto.getQuantityOfEntrants(), uint256(0), "expecting 0 entrants before entering"); Assert.equal(lotto.getLotteryBalance(), uint256(0), "expecting 0 lottery balance before entering"); lotto.enter{value:5000000000000000}(); Assert.equal(lotto.getLotteryBalance(), uint256(5000000000000000), "expecting lottery balance equal to entrance fee after entering"); Assert.equal(lotto.getQuantityOfEntrants(), uint256(1), "user should have successfully entered the lottery"); }}
This example does not inherit from the contract under test. That is useful for making it easy to manipulate the balance of the contract under test and for testing functions from an external perspective. The downside of this is that account impersonation (testing a multiple user interaction) doesn’t work without inheriting from the contract under test,
Single Entrant: Remix IDE Unit Testing Plugin: Inheriting the Contract Under Test
pragma solidity 0.6.12;import "remix_tests.sol";import "remix_accounts.sol";import "./LottoMock.sol";import "../contracts/Lotto.sol";contract lottoEntranceTestWithInheritance is Lotto { /// #value: 5000000000000000 function enterSuccessfullySingleEntrantInheritVersion() public payable { Assert.equal(getQuantityOfEntrants(), uint256(0), "expecting 0 entrants before entering"); Assert.equal(getLotteryBalance(), uint256(5000000000000000), "expecting 0 lottery balance before entering"); //this seems like an oddity with how the custom txn context is implemented with inheritance this.enter{value:5000000000000000}(); Assert.equal(getLotteryBalance(), uint256(5000000000000000), "expecting lottery balance equal to entrance fee after entering"); //this seems like an oddity with how the custom txn context is implemented with inheritance Assert.equal(getQuantityOfEntrants(), uint256(1), "user should have successfully entered the lottery"); }}
The important thing to note in this example is that the balance of the contract is altered during test setup by the value parameter of the custom transaction context.
Multiple Entrant: Remix IDE Unit Testing Plugin: Inheriting the Contract Under Test
Here is where we must inherit from the contract under test to use the value parameter in the Remix Unit Testing’s custom transaction context feature. (docs)
pragma solidity 0.6.12;import "remix_tests.sol";import "remix_accounts.sol";import "./LottoMock.sol";import "../contracts/Lotto.sol";contract LottoMultipleEntranceTest is Lotto { /// #sender: account-0 /// #value: 5000000000000000 function firstEntry() public payable { Assert.equal(getQuantityOfEntrants(), uint256(0), "expecting 0 entrants before entering"); Assert.equal(msg.sender, TestsAccounts.getAccount(0), "Invalid sender"); enter(); Assert.equal(getQuantityOfEntrants(), uint256(1), "user should have successfully entered the lottery"); } /// #value: 5000000000000000 /// #sender: account-1 function secondEntry() public payable { Assert.equal(getQuantityOfEntrants(), uint256(1), "Expecting an existing entry."); Assert.equal(msg.sender, TestsAccounts.getAccount(1), "Invalid sender"); //don't call function externally to use sender mocking enter(); Assert.equal(getQuantityOfEntrants(), uint256(2), "second user should have successfully entered the lottery"); }}
If you want to manipulate contract state to set up tests, create a Mock version of your contract and inherit from that in your test file. This approach won’t scale for large apps, but we can avoid having to mock complex integrations such as oracle integration. Example:
pragma solidity 0.6.12;import "../contracts/Lotto.sol";contract LottoMock is Lotto { function setWinner() public { winner = msg.sender; } function setProvableQueryId() public { provableQueryId = bytes32("abc"); }}
LottoMock.sol: Define functions to manually alter contract state for testing setup.
pragma solidity 0.6.12;import "remix_tests.sol";import "remix_accounts.sol";import "./LottoMock.sol";import "../contracts/Lotto.sol";contract EnterWinnerAlreadySelected is LottoMock { // lottery already completed -> then: return money, don't enter /// #value: 5000000000000000 function enterWinnerAlreadySelected() public payable { Assert.equal(getQuantityOfEntrants(), uint256(0), "expecting 0 entrants before entering"); setWinner(); try this.enter{value:5000000000000000}() { Assert.ok(false, 'succeed unexpected'); } catch Error(string memory reason) { Assert.equal(reason, "Lottery has already completed. A winner was already selected.", "Lottery already completed. User cannot enter."); } catch (bytes memory ) { Assert.ok(false, 'failed unexpected'); } Assert.equal(getQuantityOfEntrants(), uint256(0), "If a winner was already selected, there should not be any new entrants"); }}contract EnterWinnerSelectionInProgress is LottoMock { // winner selection in progress -> then: return money, don't enter /// #value: 5000000000000000 function enterWinnerSelectionInProgress() public payable { Assert.equal(getQuantityOfEntrants(), uint256(0), "expecting 0 entrants before entering"); setProvableQueryId(); //TODO is there a better way for this try this.enter{value:5000000000000000}() { Assert.ok(false, 'succeed unexpected'); } catch Error(string memory reason) { Assert.equal(reason, "Winner selection already in progress. No entries allowed now.", "Cannot enter lottery when winner selection is in progress."); } catch (bytes memory) { Assert.ok(false, 'failed unexpected'); } Assert.equal(this.getQuantityOfEntrants(), uint256(0), "user should have successfully entered the lottery"); }}
Since we’re using the Provable API as our random number oracle (see part 2 for more details), we can use the provable ethereum bridge, truffle, and solidity events to simulate the conclusion of the lottery where an oracle is called and a winner is selected.
const truffleAssert = require('truffle-assertions');const { waitForEvent, validEntryValue } = require('./utils');const Lotto = artifacts.require('Lotto');contract('Lotto', async (accounts) => { let lotto; // helpers async function assertContractBalance(expectedBalance) { const actualBalance = await lotto.getLotteryBalance.call(); assert.equal(actualBalance, expectedBalance); } async function assertEntrantCount(expectedEntrantCount) { const actualEntrantCount = await lotto.getQuantityOfEntrants.call(); assert.equal(actualEntrantCount, expectedEntrantCount); } async function enterIntoLottoAndVerifyContractState(entrant = accounts[0], expectedEntrantCount = 1) { await lotto.enter({ value: validEntryValue, from: entrant }); await assertEntrantCount(expectedEntrantCount); await assertContractBalance(validEntryValue * expectedEntrantCount); } async function selectWinnerAndWaitForCompletion() { const selectWinnerResult = await lotto.selectWinner(); await truffleAssert.eventEmitted(selectWinnerResult, 'LogWinnerSelectionStarted'); await waitForEvent('LogWinnerSelected', lotto); } beforeEach(async () => { lotto = await Lotto.new(); await assertContractBalance(0); await assertEntrantCount(0); }); it('allows winner selection with a single entrant and distributes the funds', async () => { await enterIntoLottoAndVerifyContractState(accounts[1]); const winnerBalanceBefore = await web3.eth.getBalance(accounts[1]); // after entering but before winning await selectWinnerAndWaitForCompletion(); await assertContractBalance(0); const winnerBalanceAfter = await web3.eth.getBalance(accounts[1]); // balance after winning should equal balance before winning + entry fee for 1 user assert.equal(parseInt(winnerBalanceAfter, 10), parseInt(winnerBalanceBefore, 10) + parseInt(validEntryValue, 10), 'Winner account balance incorrect after lottery completion.'); });});
In this test, we kick off winner selection and allow the provable bridge to respond via our __callback function. We’re able to assert the callback was invoked by listening for the LogWinnerSelected event. Note the use of the emit keyword in our contract under test Lotto.sol.
pragma solidity 0.6.12;import "github.com/provable-things/ethereum-api/provableAPI_0.6.sol";contract Lotto is usingProvable { address[] public entrants; mapping(address => uint) public balances; address public winner; bytes32 provableQueryId; function enter() external payable { if(balances[msg.sender] == 0 && msg.value==5000){ balances[msg.sender] = msg.value; entrants.push(msg.sender); } //else you have not paid the entry fee or have already entered } function getLotteryBalance() external returns (uint256) { return address(this).balance; } function selectWinner() public { if(winnerHasNotBeenSet() && provableQueryHasNotRun()){ provableQueryId = provable_query("WolframAlpha", constructProvableQuery()); } } function winnerHasNotBeenSet() private view returns (bool){ return winner == address(0); } function provableQueryHasNotRun() private view returns (bool){ return provableQueryId == 0; } function constructProvableQuery() private view returns (string memory){ return strConcat("random number between 0 and ", uint2str(entrants.length-1)); } //provable callback for selectWinner function function __callback(bytes32 myid, string memory result) public override { if(myid != provableQueryId) revert(); winner = entrants[parseInt(result)]; }}
Changelog:
Add balances mapping to have a constant-time way to look up entrants
Make enter a payable function to accept an entrance fee
Check entrance fee
Check balance to see if they’ve entered before
Add getLotteryBalance for debugging
Update solidity version (not shown in commit)
Add override modifier to provable callback function (updating the language version requires it)
Notes:
I need to start using separate PRs to make it easy to isolate changes between previous postings
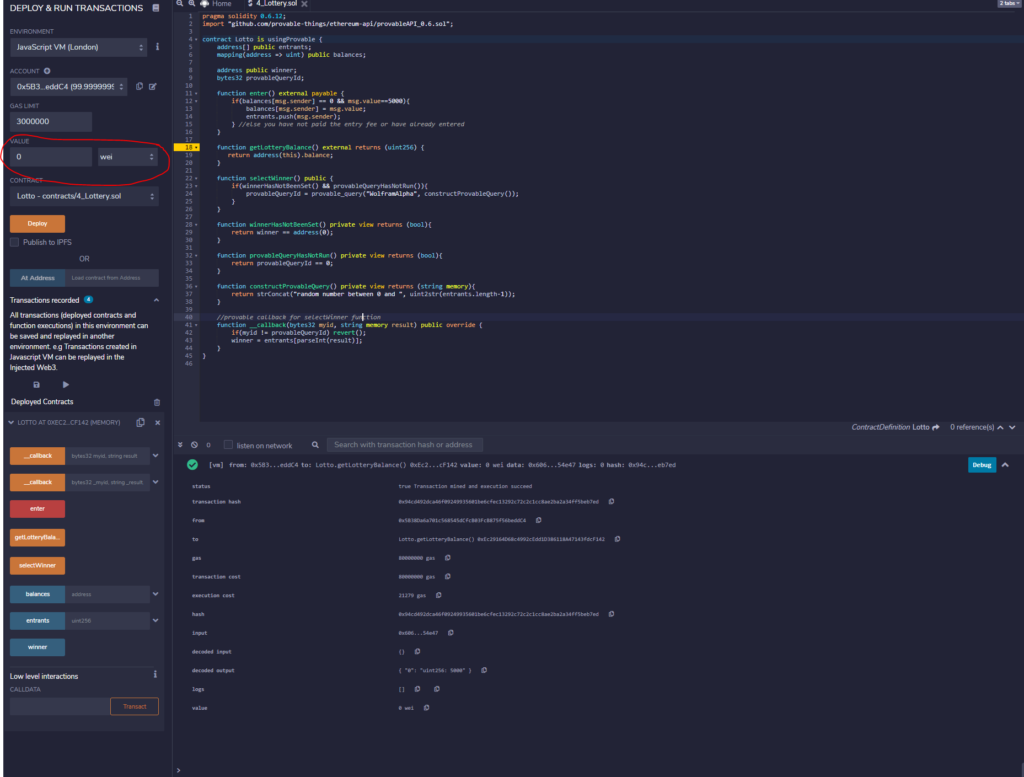
Initially it was unclear to me how to send a value with a function call, use the value field by the contract deploy button before invoking a payable function
In some contexts, investing heavily in testing is essential. For example, when processing financial transactions at a bank you’d want to have really solid integration tests.
These tests could be a mix of engineered data, re-playing of real-world data that has been manually audited, and maybe even a business rules engine built to double check and alert for any large day-over-day anomalies in processing (a banks’ total deposits increasing 50% day-over-day would be a red flag).
At the same said bank, there is a marketing effort to serve customized banners to the customer’s browser during online banking sessions. Ultimately, the business decides that this software is not critical to the businesses’ operations. The team could then decide to launch and iterate very quickly, only bothering to maintain a critical-path integration test.
Always consider: If the software you develop has bugs, or a customer receives a less than optimal experience, what is the impact on the businesses’:
Operations
Are internal operations degraded?
Are sales being affected?
Reputation
How will customers’ trust for this company be affected?
Will internal customers lose trust with our team?
How will customers (internal and external) have their opinion of the company shifted?
Consider these factors when to determine what your minimum testing requirement is.
I generally error on the side of caution as I suspect many small defects or less than optimal experiences could cumulatively lead to a small, but perceptible harm to the companies’ reputation in the customer’s mind.
Ultimately, the more tests you have, the fewer defects you’ll have, the less manual testing you’ll have to do, the less documentation you’ll have to write, and you’ll end up with a more maintainable product (in most cases).
Under external pressures, like business deadlines, or given a desire to A/B test a new feature, we, as developers must determine what is the minimal amount of testing that could be applied is while still maintaining professional standards.